Microsoft Universal Print(Last update of this topic: 03-31-2026) |
  
|
(Last update of this topic: 03-31-2026)
Microsoft Universal Print(Last update of this topic: 03-31-2026) |
|
Microsoft Universal Print is Microsoft's SaaS cloud printing service for O365/M365 and Azure customers who want to make printers from on-premises print servers available in the cloud.
With the Microsoft Universal Print integration, steadyPRINT enables the management of printers and assignments including all necessary operations in Azure ermöglicht mit der Microsoft Univeral Print-Integration die Verwaltung von Druckern und Zuweisungen mit allen notwedigen Operationen in Azure, which simplifies and speeds up the management of Univeral Print printers. This includes the following actions:
| • | Registration of printers |
| • | Share of printers |
| • | Setting printer access for assigned security groups |
| • | Creation of policies in Intune for the deployment/assignment of printers to end devices |
The following steps describe the installation and setup process for the use of steadyPRINT with Microsoft Universal Print.
Requirements
| • | An active Universal Print license for the same Microsoft Entra ID |
| • | Each user who wants to manage the universal printers in Universal Print must be assigned the Printer Administrator role and Intune Administrator role or higher. |
| o | The Universal Print license must be assigned to the printer administrators. |
| • | The computer of the user runs Windows 10 version 1903 or higher and is either: |
| o | Microsoft Entra joined |
| o | Microsoft Entra Hybrid joined |
| • | The user must log in locally using the same account he uses to sign in to the WebCenter and must also use that account for authentication with Azure and Intune. |
| • | steadyPRINT Agent installed on the computer from which the configuration is performed (required for authentication) |
| o | Specify steadyPRINT API access during installation with API address and API port |
| o | Verification of the locally installed certificate that was stored in chapter Sicherstellung von lokal installiertem Zertifikat, das in Kapitel Register steadyPRINT in Microsoft Entra ID. |
Installation and Registration of Microsoft Universal Print Connector
Please follow these steps to install and configure the system:
| 1. | First, download the Microsoft Universal Print Connector. |
| 2. | Once downloaded, run the setup program and follow the installation instructions. |
| 3. | Launch the PrintConnectorApp application using the shortcut on your desktop. |
| 4. | Log in with a user account that has the Printer administrator role or higher. |
| 5. | Enter a connector name, e. g. [Computer name]-UP-Connector. |
| 6. | Start the registration via the button Register. |
Note |
Different print servers |
|
Repeat these steps for all print servers that are to be provided in Azure. |
Registration of printers via Microsoft Universal Print Connector (optional)
Note |
Registration directly through steadyPRINT |
|
Registration can also be done directly through steadyPRINT using the installed Print Connector. If the printer is not registered in Microsoft Universal Print, it will be automatically added. |
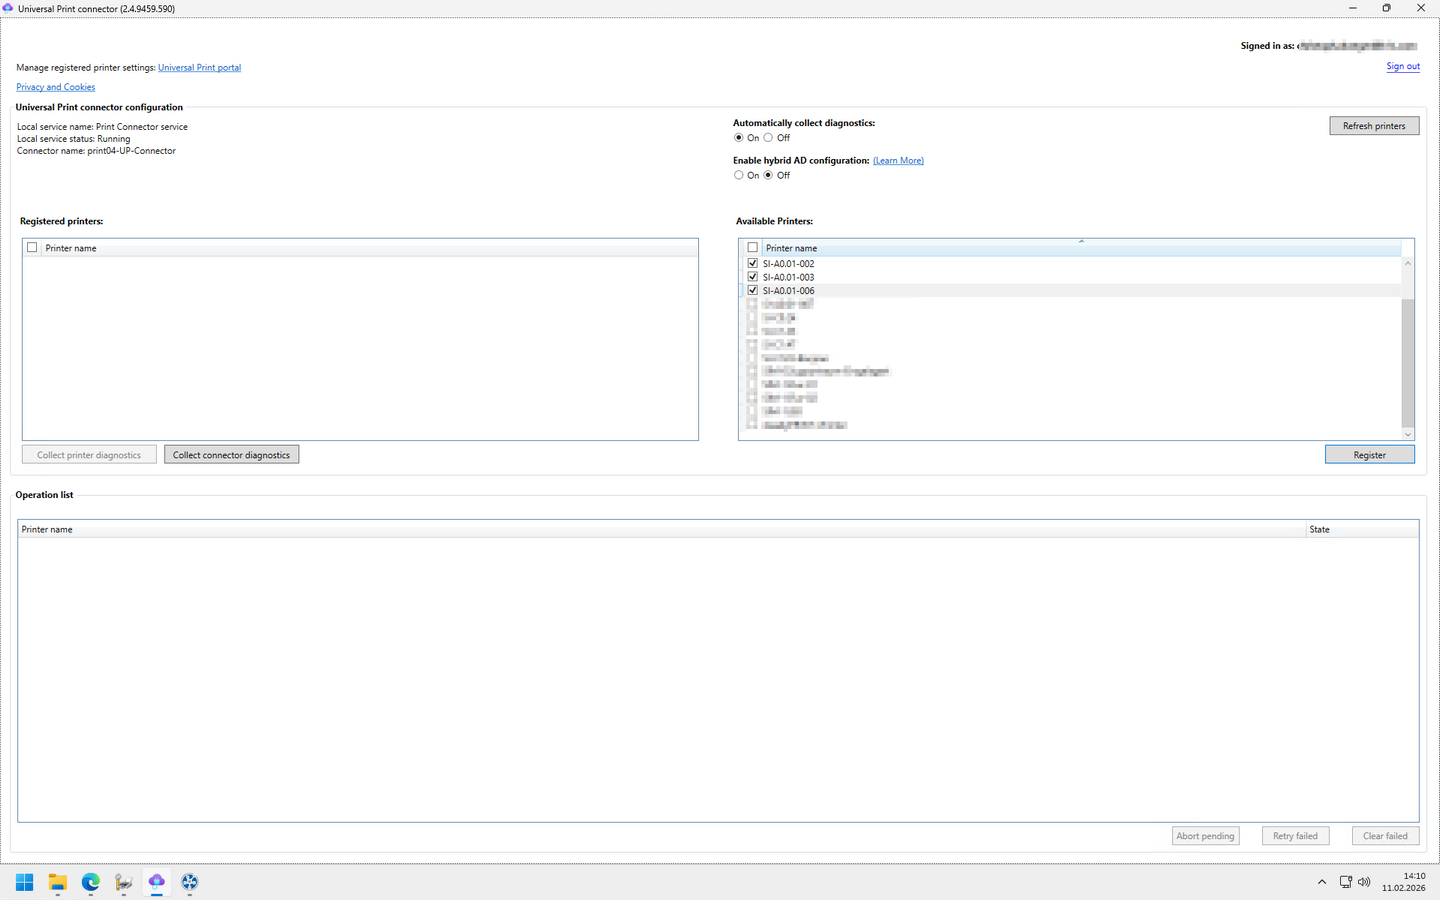
After successfully registering the Connector, you can register the printers in Universal Print. To do this, select the printers you want to register on the right-hand side and click the Register button. On the left side, both new and already registered printers are displayed (see figure: Microsoft Universal Print - Registrierung of printers via Universal Print Connector).
Figure 17: Microsoft Universal Print - Registration of printers via Universal Print Connector
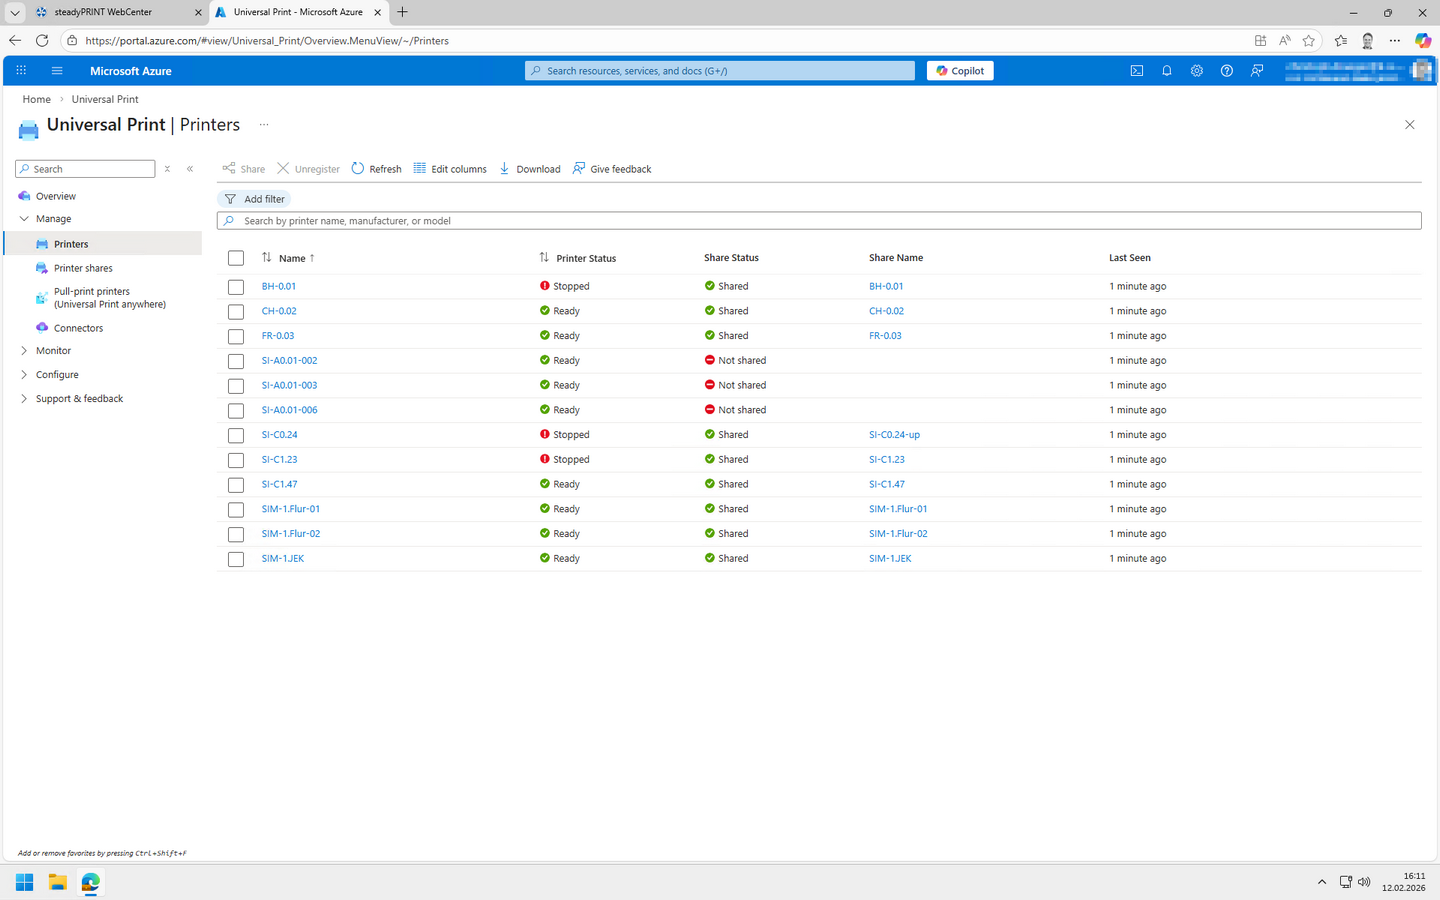
The registered printers can then be viewed under https://portal.azure.com > Azure > All Services > Management and governance > Universal Print (see figure Microsoft Universal Print - Registered printers).
Figure 18: Microsoft Universal Print - Registered printers
Synchronization of printers
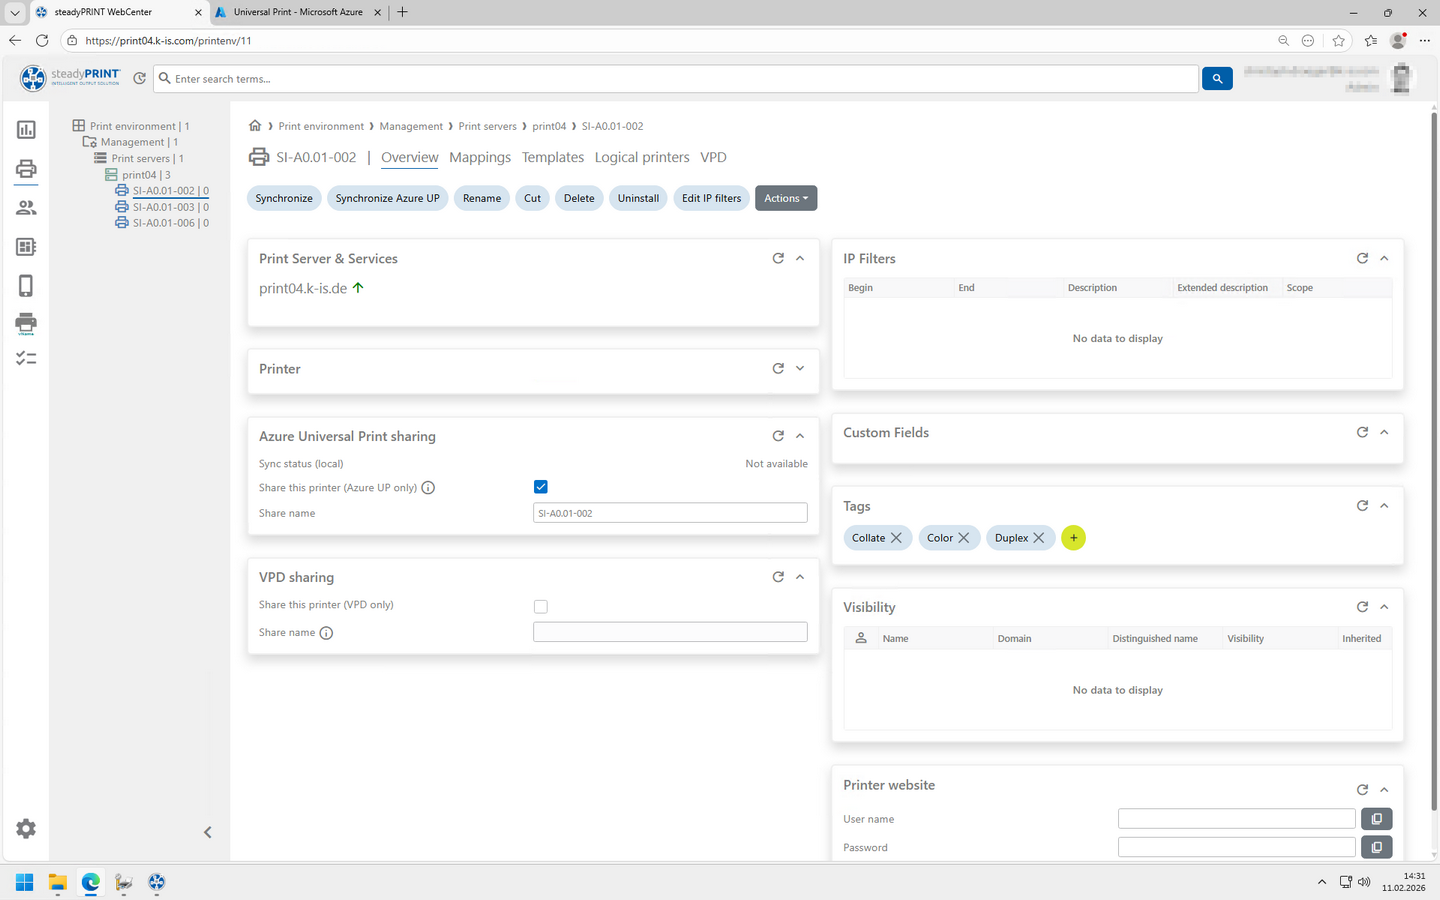
Release to Microsoft Universal Print is performed via the respective printer in the steadyPRINT WebCenter. To do this, check the box next to Share this printer (Azure UP only) in the Azure Universal Print sharing section, and then click the Synchronize Azure UP button (see figure steadyPRINT WebCenter - Synchronize printer to Azure). For synchronization, steadyPRINT will ask you to sign in to Azure and, later on, to Intune. This is done programmatically using the steadyPRINT Agent.
Figure 19: steadyPRINT WebCenter - Synchronize printer to Azure
The synchronization must be performed every time you make changes to the printer, such as updating the Share name.
This process involves the following steps:
| • | Register printers via Print Connector in Azure Universal Print |
| • | Create/update printer share in Azure |
| • | Create/update a policy for security groups in Intune |
Note |
Note user login |
|
The logged-in and executing admin user in the steadyPRINT WebCenter must use the same account locally and also use it for authentication with Azure and Intune. |
Note |
Status synchronization |
|
The status displayed for synchronizing the configuration in Azure Universal Print may differ from the actual status. This is based exclusively on a status stored in the steadyPRINT database. In order to ensure the correct status, perform all actions exclusively through the steadyPRINT WebCenter. |
Assignment of user groups
Note |
Enable assignment type Azure Universal Print |
|
For the assignment of Entra ID groups on Universal Print printers, the assignments type Azure Universal Print must be first enabled under Settings > Center > General settings > Available assignment types in the Center in the steadyPRINT WebCenter.
After adjusting the assignment types, remember to save your changes. |
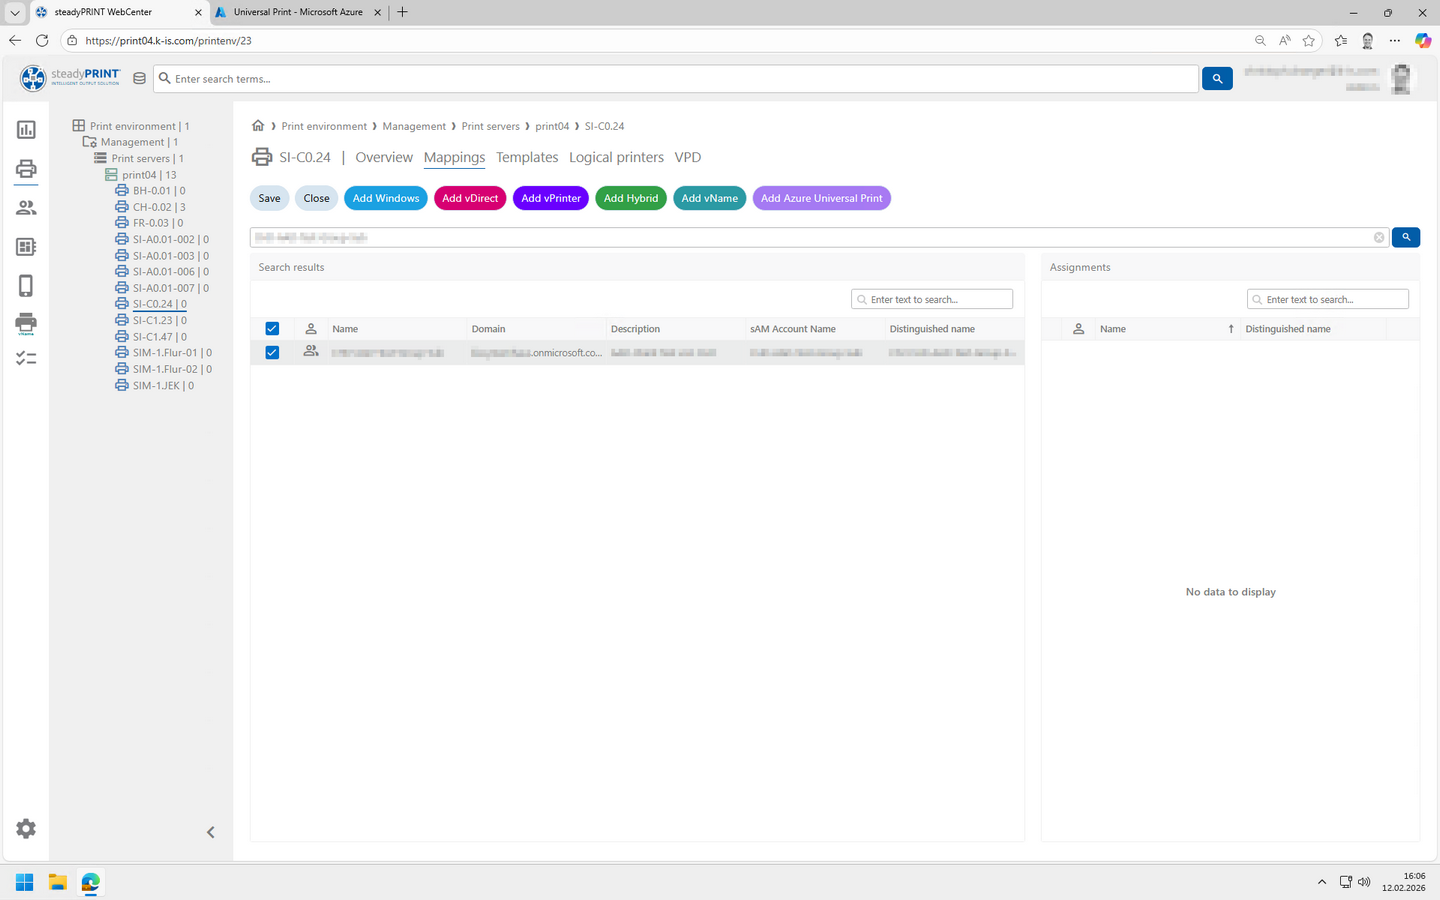
The assignment of Entra ID groups is then carried out in the same way as the familiar procedure. However, when adding, select Add Azure Universal Print (see figure steadyPRINT WebCenter - Assign printers).
Figure 20: steadyPRINT WebCenter - Assign printers
After the assignments have been made, sychronization with Azure and Intune is required. The steadyPRINT WebCenter will also inform you accordingly.
The implementation – that is, the creation of the Universal Print printer – is handled by the operating system itself, but is initiated by the steadyPRINT Agent. The duration of the implementation may vary depending on caching behvior and network connectivity. Please note that, for example, configured IP filters do not affect the mapping, as this is handled outside of steadyPRINT via group policies.
Note |
Limit on the number of security groups |
|
You can assign up to 20 security groups on the Azure side. |
The policies created for printer provisioning can then be viewed at https://intune.microsoft.com > Devices > Manage devices > Configuration > Policies. They follow this format: steadyPRINT UPP [Druckername] ([GUID]).