View(Last update of this topic: 12-02-2021) |
  
|
(Last update of this topic: 12-02-2021)
View(Last update of this topic: 12-02-2021) |
|
Basically, the same components can be found in both the replication and migration screens. The following explanation will be in reference to the migration view as it also contains special supplementary operations in addition to the standard ones. References will be made at the appropriate junctions as to which functions will not be available in the replication screen.
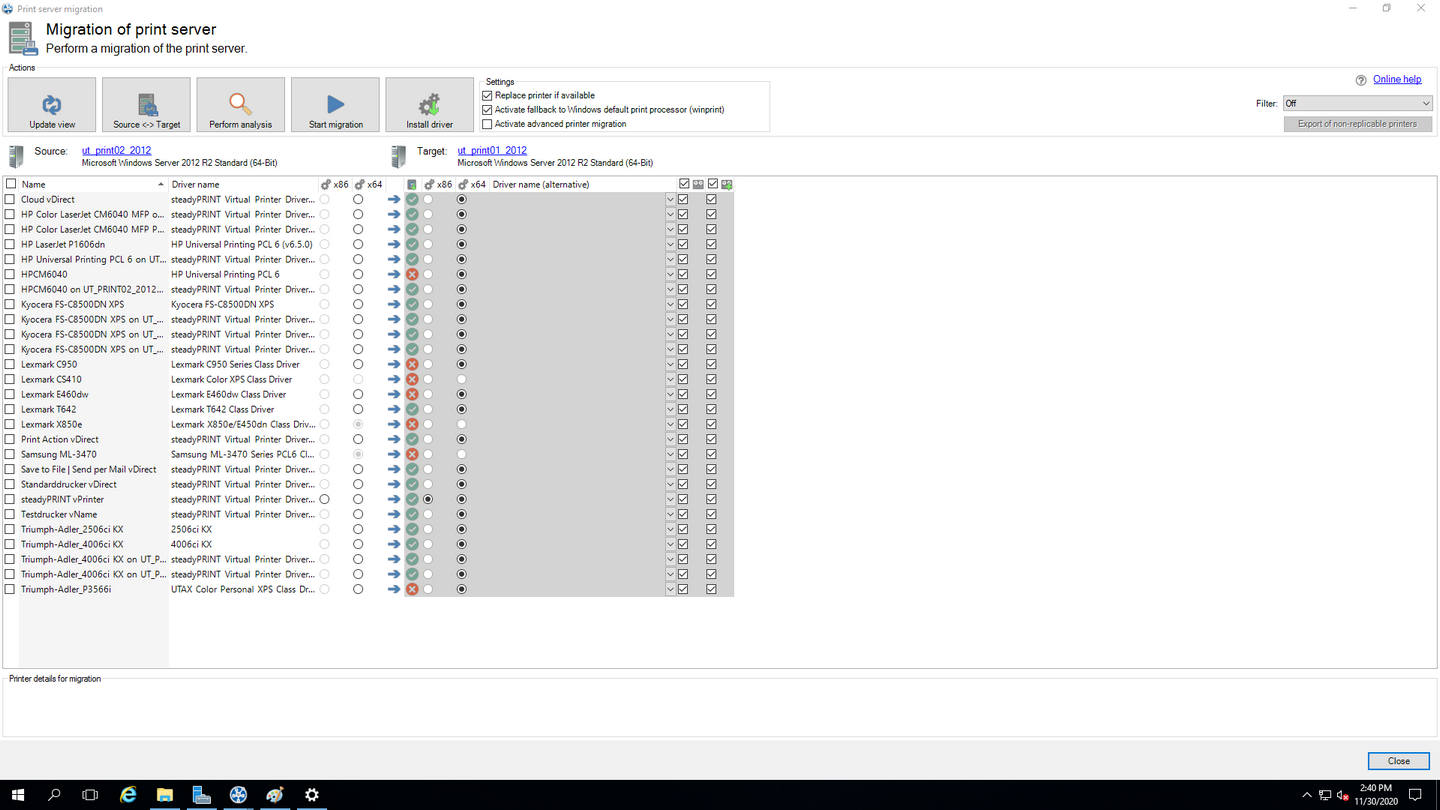
Figure 178: steadyPRINT Center – migration view
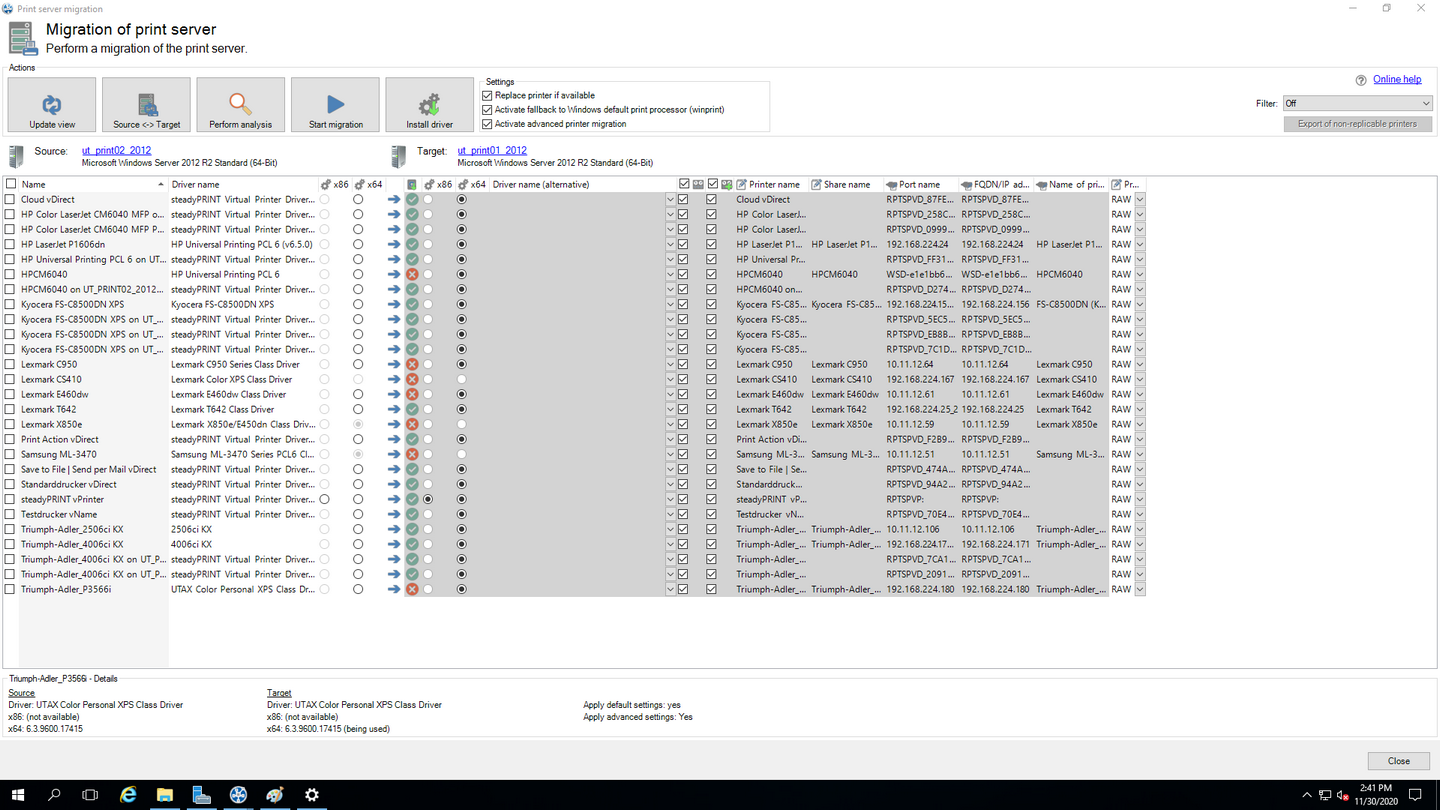
Figure 179: steadyPRINT Center - extended migration view
First, please find below a legend (see table 2) with an explanation of the individual control elements found in Figure - steadyPRINT Center - migration view and Figure - steadyPRINT Center - extended migration view.
Control element |
Description |
|
|||||||||
1 – Refresh View |
Loads the necessary data from the print server and refreshes the view. |
||||||||||
2 – Perform Analysis (migration only) |
Analyzes the printers for migration and highlights them with various colors:
|
||||||||||
3 – Start Replication/Migration |
Starts the replication or migration process. This can last several minutes or even hours, depending on the number of printers, drivers, etc. to be copied. |
||||||||||
4 – Install Drivers |
Opens the dialog screen to install an additional printer driver (only possible locally). |
||||||||||
5 – Print Processor |
When active, the Windows print processor "winprint" is used as a fallback if the migration with the default print processor setting from the source system fails. When migrating from a 32- to a 64-bit system, the print processors might not be compatible. |
||||||||||
6 – Source System |
Displays the name and the version of the source system.
Tip: Click on the name of a print server to open a remote desktop connection. |
||||||||||
7 – Target System |
Displays the name and the version of the target system.
Tip: Click on the name of a print server to open a remote desktop connection. |
||||||||||
8 – Filter |
Filters for the printer displays:
|
||||||||||
9 – Details |
Displays the details concerning a selected printer. |
||||||||||
a – Printer Selection |
Selects a printer for either replication or migration. |
||||||||||
b – Name |
Displays the name of the printer. |
||||||||||
c – Driver Name |
Displays the driver name of the printer. |
||||||||||
d – x86 (Source) |
Displays whether a 32-bit driver is installed on the source system. |
||||||||||
e – x64 (Source) |
Displays whether a 64-bit driver is installed on the source system. |
||||||||||
f – Installed (Target) |
Displays whether the printer and its dependencies are installed on the target system:
|
||||||||||
g – x86 (target) |
Displays whether a 32 bit driver is installed on the target system. |
||||||||||
h – x64 (target) |
Displays whether a 64 bit driver is installed on the target system. |
||||||||||
i – Alternative Drivers (migration only) |
The possibility to select an alternative driver that can be used during migration.
This column is predefined after an analysis if the same printer already exists on the target system with another driver.
Should a 64-bit driver do not exist on the source or target systems, you will be requested to select an alternative driver for the migration so that the process can be completed successfully.
Please note: All available drivers for the respective target system are listed for selection. They can be viewed under Printer Administration > Print Server > [COMPUTER] > Drivers on the Windows Print Server. |
||||||||||
i – Extended Printer Migration (migration only) |
Activates the view for the extended migration.
The additional columns are initialized with default values which can be adjusted as described under [...]. |
||||||||||
j – Apply Default Settings |
Indicates whether the default printer settings are to be transferred to the target system. |
||||||||||
k – Apply Extended Settings |
Indicates whether the extended printer settings are to be transferred to the target system. |
||||||||||
l – Printer Name (extended migration only) |
Indicates which name the printer to be migrated has on the target system after migration. This value is editable. |
||||||||||
m – Port Name |
Indicates which name the port to be migrated has on the target system after migration. This value is editable. |
||||||||||
n – FQDN/IP-Address |
Indicates which FQDN or IP address the port to be migrated has on the target system after migration. This value is editable. |
||||||||||
o – Name of the Print Queue |
Indicates to which print queue the port shows after migration. Only necessary for protocol "LPR". This value is editable. |
||||||||||
p – Protocol |
Indicates the protocol the printer port communicates with. This value is editable. |
Table 2: steadyPRINT Center: Replication/migration legend
Extended Printer Migration and Adaption of Default Values
The columns of the extended printer migration are initialized with default values. During a migration, the same pattern for printer names, port names etc. is frequently used. steadyPRINT allows a configuration of these default values which enables you to influence the initialization and thus to reduce the administrative work during a printer migration. Once the migration view has been opened, this configuration file can be found under %APPDATA%\steadyPRINT\migrationTable.xml as XML file. These files can be edited with a usual text editor (e.g. notepad). While doing so, indices of the respective default pattern can be adapted by using the definitions listed below.
Excerpt of the configuration file migrationTable.xml:
[...]
19 <SOAP-ENC:Array id="ref-3" SOAP-ENC:arrayType="xsd:anyType[5]">
20 <item id="ref-9" xsi:type="SOAP-ENC:string">[PortProtocol - Modify here!]{0}</item>
21 <item id="ref-10" xsi:type="SOAP-ENC:string">[PrinterName - Modify here!]{0}</item>
22 <item id="ref-11" xsi:type="SOAP-ENC:string">[PortQueue - Modify here!]{0}</item>
23 <item id="ref-12" xsi:type="SOAP-ENC:string">[PortAddress - Modify here!]{0}</item>
24 <item id="ref-13" xsi:type="SOAP-ENC:string">[PortName - Modify here!]{0}:{1}</item>
25 </SOAP-ENC:Array>
[...]
The following table shows the meaning of the respective lines and values. The patterns can also contain combined values (see line 24). Applied to the printer name, you could thus define for example the prefix Printer_ for every printer to be migrated.
Line |
Entry |
Index |
Default Pattern |
Example for Index 0 |
20 |
PortProtocol |
0 = RAW (default) 1 = RAW 2 = LPR |
{0} |
RAW |
21 |
PrinterName |
0 = printer name from source 1 = print server name from source |
{0} |
Lexmark T642 |
22 |
PortQueue |
0 = shared name from source 1 = printer name from source |
{0} |
T642 |
23 |
PortAddress |
0 = FQDN/IP address of port from source 1 = print server name from source 2 = port name from source |
{0} |
192.168.100.150 |
PortName |
0 = print server name from source 1 = printer name from source 2 = port name from source |
{0}:{1} |
DE_Client123:Lexmark T642 |
Table 3: steadyPRINT Center - Definition of configuration file for printer migration
Note |
Transfer of Changed Printer Settings |
|
Changed printer settings are identified but not visualized by steadyPRINT. Simply select the desired printer and perform the replication or migration in order to transfer the changed settings from the source to the target system. |
Note |
Extended Migration |
|
The extended migration is mainly used to transfer local printers to a print server. For this purpose different types of terminals, that can be configured, are necessary (USB port turns into TCP/IP port).
All arrays that belong to the extended migration are initialized with default values. A description of how to adjust these values can be found in [...]. |