Installation(Last update of this topic: 04-01-2026) |
  
|
(Last update of this topic: 04-01-2026)
Installation(Last update of this topic: 04-01-2026) |
|
In order to use the SecurePrint App, the SecurePrint Server has to be provided on a web server first. For this purpose, the steadyPRINT installation package offers to host SecurePrint on a separate web server (Kestrel).
System requirements for hosting SecurePrint
The following requirements have to be fulfilled in order to install steadyPRINT SecurePrint on the server:
| • | Windows Server 2012 R2 or higher |
| • | Microsoft .NET Framework 4.8 |
| • | ASP.NET Core 5.0 Runtime Windows Hosting Bundle |
Installation of the SecurePrint server
When installing steadyPRINT, additionally select the SecurePrint installation component. Moreover, steadyPRINT Server and steadyPRINT API have to be installed for SecurePrint to work. All further steps remain unchanged.
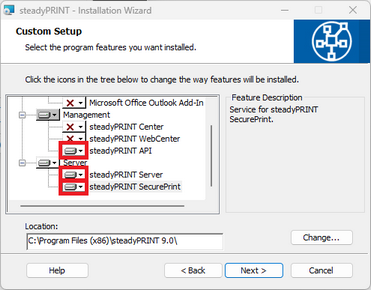
Figure 92: Installation of SecurePrint
Configuration of the required port
By default, the SecurePrint Server runs on port. If an adjustment is desired, it must be done manually via the respective appsettings.json configuration file. For this purpose, open the configuration file [Install]\install.SecurePRINT\appsettings.json. Then the HTTPS port is adjusted via the property ServerDefaultOptions.HttpsPort. After the adjustment of the port, restart the service steadyPRINT SecurePrint! The port can be configured very easily via the steadyPRINT Service Management App.
Installation of the required certificate
By default, the SecurePrint Server runs with the certificate common name: localhost. If an adjustment is desired, it must be done manually via the respective appsettings.json configuration file. For this purpose, open the configuration file [Install]\install.SecurePRINT\appsettings.json. Then the certificate is adjusted via the property ServerDefaultOptions.CertCN. After the adjustment of the certificate, restart the service steadyPRINT SecurePrint! The certificate can be configured very easily via the steadyPRINT Service Management App.
Configuration of several databases for update processes
Since version 11.5, it has been possible to connect multiple databases, allowing users to transition smoothly between the old and new environments during a SecurePrint update. This allows users to retrieve and print print jobs from both environments.
To do this, after the new SecurePrint version has been installed, a file api_secondaryForSecurePrint_appsettings.json under %ProgramData%\steadySUITE\steadyPRINT X.X must be created with the following content:
{
"DatabaseConfig": {
"Database": "steadyprint115",
"DbPasswd": "password",
"DbUser": "user",
"Location": "sqlserver\\sqlexpress",
"ConnectionString": ""
},
"SpServiceConfig": {
"HostName": "printserver01",
"Port": 8008,
"Upn": "steadyprint.com\\spservice"
}
}
Below is a description of the respective fields from api_secondaryForSecurePrint_appsettings.json:
DatabaseConfig: Indicates the database connection to the second environment
SpServiceConfig:HostName: Host name of the steadyPRINT Server service in the secondary environment
SpServiceConfig:Port: Port of the steadyPRINT Server service in the secondary environment
SpServiceConfig:Upn: UPN from the steadyPRINT Server service in the secondary environment (empty by SYSTEM as a service user)
DatabaseConfig is required to determine the database connection information for the second environment. The property ConnectionString is initially empty and is automatically filled with an encrypted DbConnectionString from the credentials. These will be deleted in the process so that they are no longer stored in plain text.
SpServiceConfig is required to use the print server from the old environment for the printout that is connected to the second database. This requires the connection information for the steadyPRINT Server service.