Automatic(Last update of this topic: 05-22-2015) |
  
|
(Last update of this topic: 05-22-2015)
Automatic(Last update of this topic: 05-22-2015) |
|
General
In steadyPRINT version 5.1.2, the automatic update has been completely revised. (See figure Update Settings - download and installation)
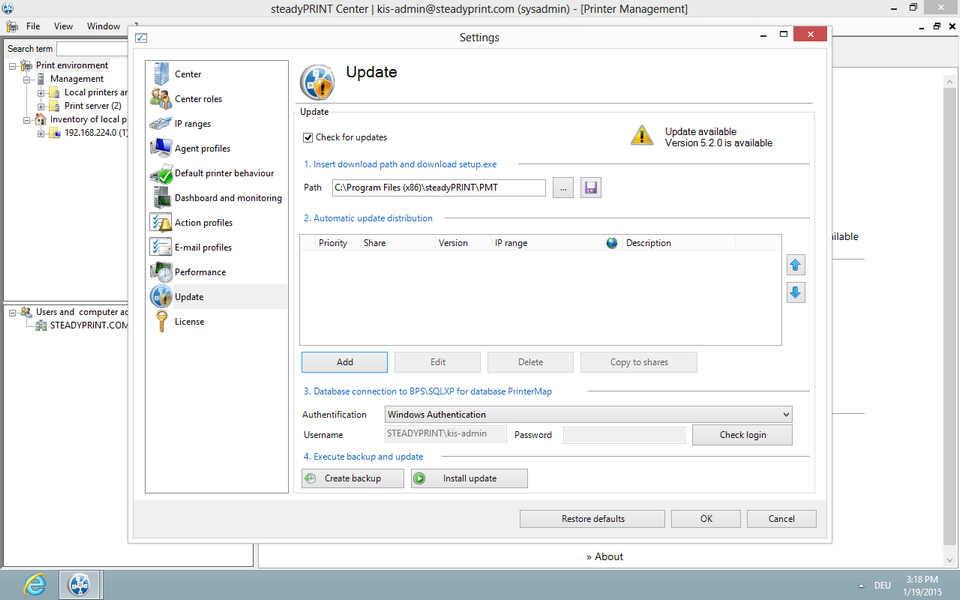
Figure 12: Update Settings - download and installation
You will find update settings and notifications under file/settings/update.
New updates which are available will be displayed there.
In addition, it will be displayed on the home screen whether an update is available.
It is possible to switch off the check for new updates with the flag "check for updates".
Note |
Update Check |
|
For update checks, the Center must be authorized to query an XML via port 80 in the internet and to download a file respectively. |
The settings for the update are divided into four steps. (See figure Update settings - 4 steps)
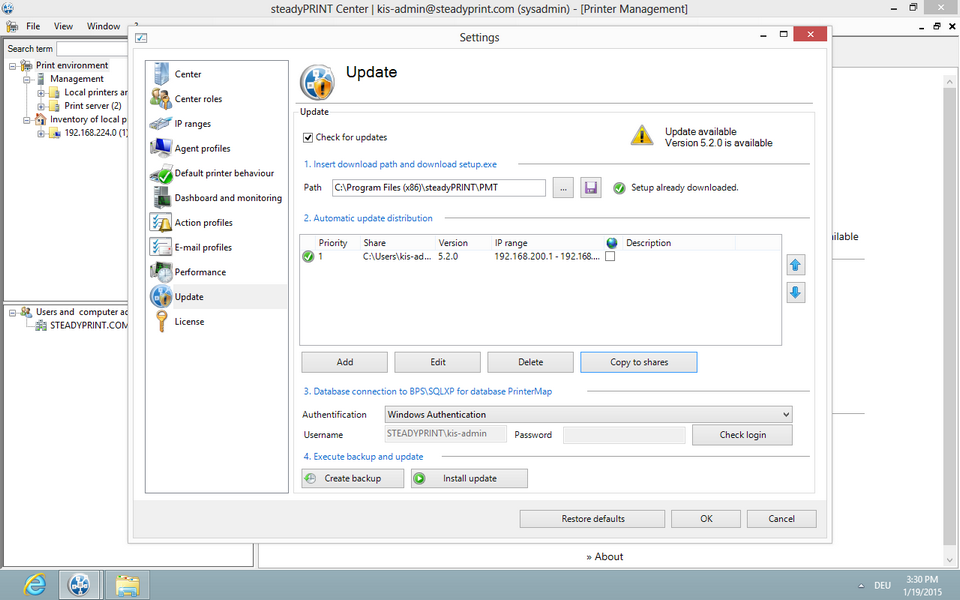
Figure 13: Update settings - 4 steps
Step 1
In the first step, the download folder into which the Setup.exe is downloaded can be defined. By default, the path of the steadyPRINT Center is specified.
The Setup.exe can then be downloaded via the disk icon. A small green checkmark indicates that the update has already been downloaded. Nevertheless, it is possible to download the update again.
Step 2
In the second step, the automatic update distributions are created. This step is not mandatory if the Clients are, for example, updated via a software distribution.
Important |
Automatic Update of the steadyPRINT Agents |
|
For the automatic update of the steadyPRINT Agents, version 5.1.2 is required. |
The settings for the steadyPRINT Agents can be made via the automatic update distribution. It can be specified at what time the steadyPRINT Agent should check for updates and from which Share the setup should be loaded.
The settings can additionally be restricted via IP ranges.
Furthermore, it is possible to change the sequence of the single shares. It can thus be determined which of the relevant shares is to be used first.
Important |
Agent Profile |
|
The distribution can be switched off in the Agent profiles. Disable the checkbox "Update: enables the automatic update" in the tab "Setup". |
Important |
Terminal Server |
|
The automatic update is disabled by default on the terminal servers and cannot be enabled. |
A new distribution can be created via „Add“. (See figure Creation of a new distribution)
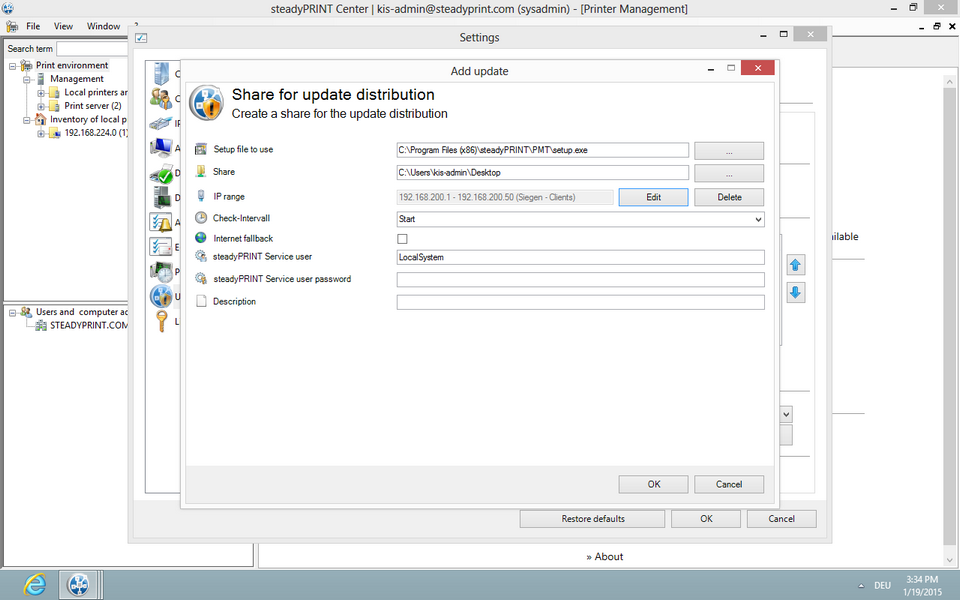
Figure 14: Creation of a new distribution
The setup.exe to be used and one share must necessarily be entered to the dialog "add update". This share identifies the path from which the setup.exe is to be loaded in future. It is therefore important that the Agents have access to this share. In order to restrict the access, please use IP ranges.
A distribution to several subsidiaries requires the indication of an IP range in order to distribute the load to several shares or points in time. An existing IP range can be selected or newly created via "Edit".
Note |
Several Subsidiaries |
|
Several shares and IP ranges with several subsidiaries have to have the respective authorizations. |
The check interval indicates at which time updates have to be checked for in the steadyPRINT Agent. When pressing „Start“, the check is performed only when starting the Agent. When pressing „Click“, the check is performed any time the Agent is called out of the tray. Additionally, there are time intervals and the check is performed after the set time has expired. It is possible to choose a multi-selection.
The checkbox Fallback indicates, whether the fallback should be resorted to in case the share is not available. In this process it is tried to download the setup from the internet.
By indicating the service user and password, the steadyPRINT Service can be run on the Client under a different user. If the boxes are left blank, the service is installed under LocalSystem.
Under Description, a free text describing your configuration can be entered.
When pressing „Save“, a dialog box opens and the current setup files can be selected. It is then tried to copy the file to the indicated share. If this process fails, the file has to be stored there by yourself, the distribution will nonetheless be saved.
The configuration is now active. In case of an initial configuration or modification, the affected Agents, however, have to be restarted.
You can also edit or delete the configuration.
Via „Copy to shares“, the setup file can automatically be copied to the indicated shares. This is interesting for further updates if the distributions are already configured. In case a copy process is not possible, you will be informed by an appropriate icon in the list.
Outdated versions on a share are indicated by a red icon. The version can be updated via „Edit" or „Copy to shares". If the share is not accessible and the file is copied to the share by yourself, you can update the respective entry via the button "Resolve the conflict" so that it is marked as "ok".
Step 3
In the third step, the authentication type and login data for the database connection need to be entered.
By default, an authentication under Windows requires the current user.
For the installation of the update, the indication of a database user with respective privileges is mandatory.
Via the button "Login test" you can now verify the login data. Moreover, you now have the possibility to create a database backup via the button "Backup".
Step 4
In the fourth step, the update can be installed and additionally a database backup (.bak file) can be created.
Important |
Backup of the Database |
|
Please create a database backup before the update is started.
|
Before the update is started, a window with security questions is displayed. The update starts as soon as all points are confirmed. (See figure Security questions)
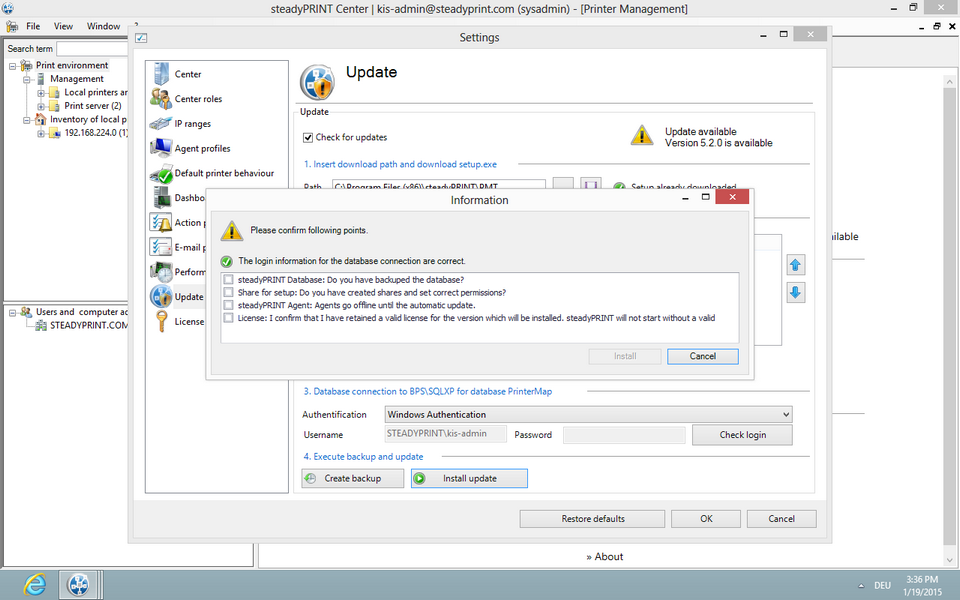
Figure 15: Security questions
During the installation of the update, the Center is automatically closed. After completion of the update, the Center has to be restarted.
Manual Distribution
It is possible to execute the setup for the steadyPRINT Agent and steadyPRINT Service directly via Command-Line. For this purpose, the following parameters have to be set:
IS_SQLSERVER_SERVER: The current database server
IS_SQLSERVER_USERNAME: The database user for steadyPRINT
IS_SQLSERVER_PASSWORD: The corresponding password for the database user
setup.exe /s /v" /qn IS_SQLSERVER_SERVER=server\instanz IS_SQLSERVER_USERNAME=user IS_SQLSERVER_PASSWORD=passwort"
In addition, the call can be extended by the Service user for the steadyPRINT Service.
IS_NET_API_LOGON_USERNAME: Service-User
IS_NET_API_LOGON_PASSWORD: Password of the Service user
The steadyPRINT Center and the database can also be updated via Command-Line.
/s /v" /qn CREATESTEADYDB=1 IS_UPDATE=1 IS_SQLSERVER_SA_USER=user IS_SQLSERVER_SA_PW=passwort IS_SQLSERVER_SERVER=server\instanz IS_SQLSERVER_USERNAME=agentUser IS_SQLSERVER_PASSWORD=agentUserPasswort"
CREATESTEADYDB: 1 = CreateSteadyDB executed , 0 = no execution of CreateSteadyDB
IS_UPDATE: 1 = Update database , 0 = Create new database (only in case of initial installation)
Component Overview
The component overview also indicates whether a new version is available. (See figure Component overview).
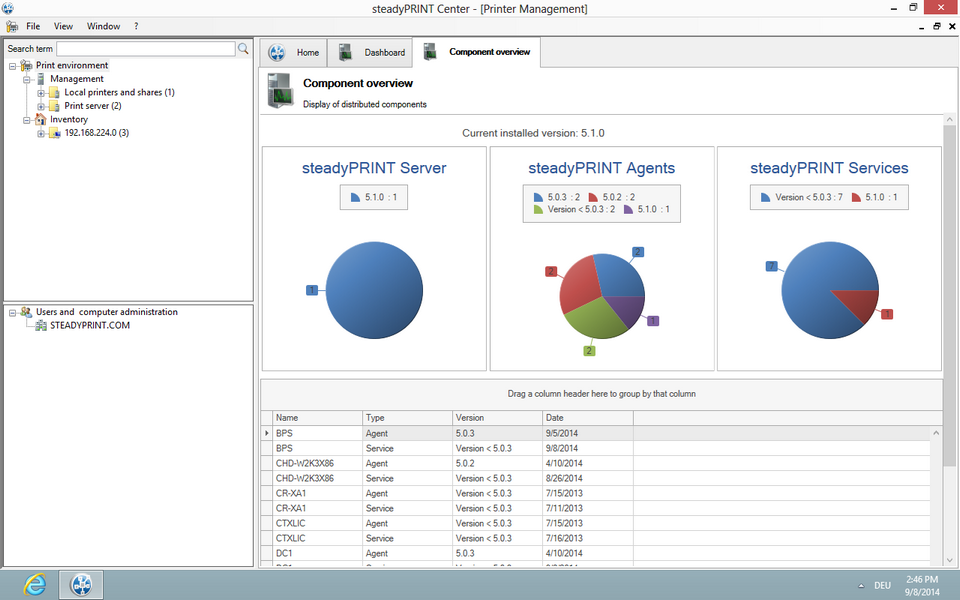
Figure 16: Component overview
Moreover, it is shown which versions are currently installed. There are three graphics divided into steadyPRINT Server, steadyPRINT Agent and steadyPRINT Service.
A list of all components is displayed below. There you will have the possibility to sort and filter by the respective columns. To do so, navigate over a column head and click the filter symbol. In addition, you can group by columns.
Moreover, the list can be exported via a right click.